|
|
||||||||||||
|
|
||||||||||||
|
|
||||||||||||
|
|
||||||||||||
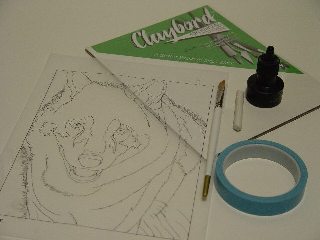
Creating a scratchboard rendering does not involve many
supplies. For a working surface, I use a piece of white
Claybord which has a nice "scratchability" to it and a very
stiff masonite backing. Black India ink will be applied
to the board with a soft paintbrush. Special blue tape,
which will not stain the Claybord, will be used to define a
crisp outside border. Not pictured here is an X-Acto
knife and a package of No. 11 blades, the only implements I
use to scratch any kind of fur or hair on my artwork.
My drawing has been outlined in pencil on tracing paper.
Notice the "x's" on the top and bottom of my drawing.
These will be used to position my drawing correctly on the
board.
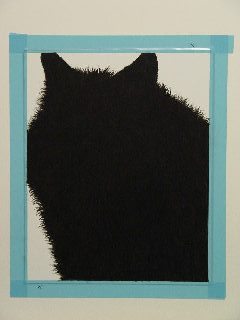
Here, I've taped the Claybord down to some foam core so
that it won't move around while I'm working on the
artwork. Taping it around the edges at this point also
allows me to have a nice sharp border when the tape is
removed.
I've traced the outline of the wolf onto the Claybord with a
pencil and have totally filled it in with India ink, using my
soft paintbrush. The "x's" have helped me to position my
drawing correctly.
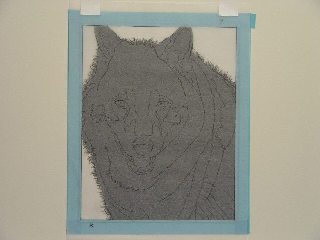
I've now positioned my tracing paper drawing over the black silhouette of India ink. I'm getting ready to chalk the back of my drawing with the white chalk, and then I'll trace the drawing down, using a sharp roller pen.
The guidelines I've traced down onto the ink silhouette can be easily rubbed off. They help me along the way, however, to know exactly where to scratch. If used for reproduction, as my works customarily are, I cannot make mistake, just re-ink the surface, and proceed. Everything, including every good and bad scratch, shows up when this type of work is photographed or scanned, so I have to be very careful where I put my scratches; otherwise, I'll have to throw the piece away and start over again.
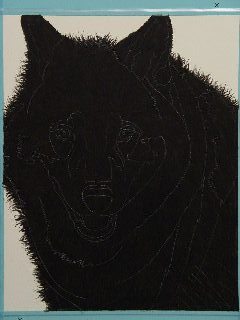
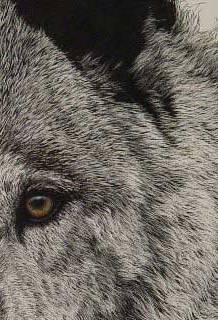
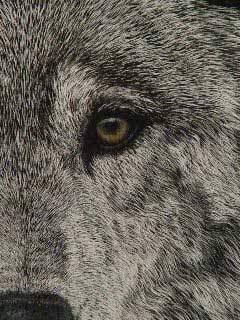
Using my X-Acto knife and hundreds of blades, I scratch through the black ink to the white surface below. The process is just the opposite of pen and ink. I am removing ink instead of applying it. The scratchboard painting, at this point, is totally black and white, except for the eyes and the mouth. It's important for me to paint the eyes early on in the process. If the eyes aren't right, there's no need to continue with the rest of the picture. Besides, I rather like having the animal I'm portraying "watch" me as I complete the rest of him!
I'm scratching right into the solid black surface, turning my blade this way and that to achieve a hair-like quality. All sorts of different strokes are needed for one animal, from the long guard hairs on a wolf, to the very short hairs around his nose and eyes and paws. Varied strokes are used for horse manes, and for buffalo hair, but all are rendered with only my X-Acto knife and blades.
Here's a real close-up of how I paint an eye. I use acrylics, which give the eye a more liquid look than what I could achieve with scratching only. The surrounding scratches give one a good example of the first layers of hair or fur on this wolf.
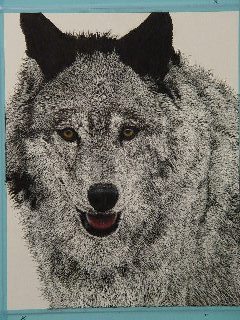
Once the picture is totally scratched in black and white,
I'm ready for the color. Using transparent acrylic inks,
I airbrush color onto the wolf first, and then onto the
background later. (Sometimes, I use acrylics to paint a
background scene.) I've already gone back in several
times and have scratched again and again to build up the
feeling of deep fur. Scratching after color is applied
also brings out highlights. During this final stage,
I'll add whiskers and other small details.
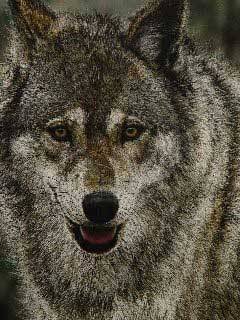
When the picture is complete, I spray the board with a special
sealer designed just for Claybord. Now, I can frame the
piece without glass, and it will be protected from fading,
dust, and moisture for many, many decades.